1.
sudo add-apt-repository -y ppa:webupd8team/java
2.
sudo apt-get update
3. accept the oracle jdk8 license automatically
echo oracle-java8-installer shared/accepted-oracle-license-v1-1 select true | sudo /usr/bin/debconf-set-selections
4.
sudo apt-get install oracle-java8-installer
5.
sudo apt-get install oracle-java8-set-default
6. verify installed java version
java -version
2015년 4월 2일 목요일

2015년 3월 27일 금요일
How to kill screen
List screens:
screen -list
Output:
There is a screen on:
23536.pts-0.wdzee       (10/04/2012 08:40:45 AM)        (Detached)
1 Socket in /var/run/screen/S-root.
Kill screen session:
screen -S 23536 -X quit
reference link:
2015년 3월 26일 목요일
How to mount qcow2 images
1. install qemu-utils and enable nbd module
sudo apt-get install qemu-utils
sudo modprobe nbd
2. use any qcow2 image
3. connect the image to the first nbd device
sudo qemu-nbd -c /dev/nbd0 xxx.img
4. Mount the image
sudo mount /dev/nbd0p1 /mnt
5. unmount
sudo umount /mnt
6. disconnect the loopback device
sudo qemu-nbd -d /dev/nbd0
sudo apt-get install qemu-utils
sudo modprobe nbd
2. use any qcow2 image
3. connect the image to the first nbd device
sudo qemu-nbd -c /dev/nbd0 xxx.img
4. Mount the image
sudo mount /dev/nbd0p1 /mnt
5. unmount
sudo umount /mnt
6. disconnect the loopback device
sudo qemu-nbd -d /dev/nbd0
2015년 3월 23일 월요일
hostname 변경하기
1. hostname 명령을 사용해 현재 값 확인
2. /etc/hostname의 값을 변경
3. hostname -F /etc/hostname
4. 새로운 터미널을 열어 확인
2. /etc/hostname의 값을 변경
3. hostname -F /etc/hostname
4. 새로운 터미널을 열어 확인
2015년 3월 21일 토요일
Install Eclipse on Ubuntu
1. download Eclipse
http://www.eclipse.org/downloads/
http://www.eclipse.org/downloads/
2. extract download file
$ tar xvfz eclipse-java-luna-SR2-linux-gtk-x86_64.tar.gz
3. move the "eclipse" entire directory to /opt/
$ sudo mv ~/down/eclipse /opt/
$ sudo chmod 755 /usr/bin/eclipse
6. run eclipse
$ eclipse
$ tar xvfz eclipse-java-luna-SR2-linux-gtk-x86_64.tar.gz
3. move the "eclipse" entire directory to /opt/
$ sudo mv ~/down/eclipse /opt/
4. make a script for eclipse
$sudo vi /usr/bin/eclipse
input followings into the script file
$sudo vi /usr/bin/eclipse
input followings into the script file
#!/bin/sh
export ECLIPSE_HOME=/opt/eclipse
$ECLIPSE_HOME/eclipse $*
5. change permission to executeexport ECLIPSE_HOME=/opt/eclipse
$ECLIPSE_HOME/eclipse $*
$ sudo chmod 755 /usr/bin/eclipse
6. run eclipse
$ eclipse
2015년 3월 20일 금요일
putty + Xming 설정
1. Xming 설치 하면서 디폴트 따라가다가 아래화면에서
select "Multiple windows"

2. select "Start no client"
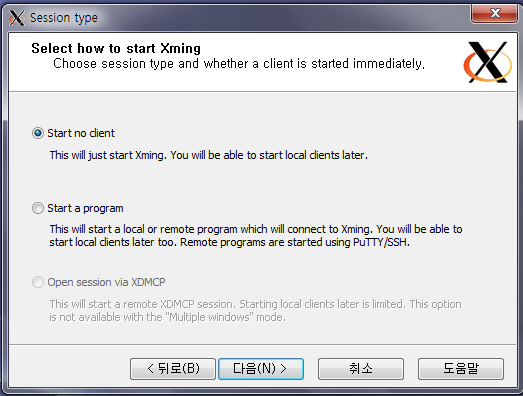
3.

4. if needed, save configuration

5. putty 또는 kitty 로 리눅스 접속시 SSH > X11 메뉴에서 아래 그림과 같이 "Enable X11 forwarding" 에 체크,

X display location 에 localhost:0 입력하고 저장후 접속하면 된다.
6. putty 에서 xterm 등을 실행해서 잘 되는지 확인하면 된다.
7. Xming 에 실행한 프로그램 폰트를 키우고 싶다면
Xming.exe:0 -clipboard -multiwindow -dpi 96 -ac -lesspointer
피드 구독하기:
글 (Atom)